Setting up Shared Channels in Microsoft Teams
- Nathan Hutchinson

- Apr 7, 2022
- 6 min read
Updated: Apr 10, 2022
Collaboration with external partners is becoming more and more the norm, COVID pushed most organisations into the cloud and even helped accelerate digital transformation for many that were holding off taking that leap to more modern or cloud-native solutions.
Microsoft Teams Connect was added to the roadmap back in March 2021 with the view to making external collaboration easier within Microsoft Teams and channels - Fast forward to today and those features are now in public preview.
So what exactly is a Shared Channel and how do we set them up?
A shared channel is now dubbed the 'third type of channel' in addition to 'Public' and 'Private' channels and it allows organisations to setup a separate channel within a Team and invite external users from other organisations, with some subtle differences to the current options.
Users can be invited directly into the Shared Channel without being brought into the Team - This is a great addition as you may not have intended to ever invite external users into an initial Team or channel and therefore you may have information in the default 'General' channel that you don't want to be accessible by external users. In the standard configuration, if you wanted to invite external users into either a Public or Private channel you would first have to add them to the Team and in doing so they gain access to the General channel, this is no longer a requirement.
Access to Shared Channels is now do-able without switching tenant within the Teams application (Yay!). Probably one of the most annoying issues with Teams was the need to 'switch tenant' within the application when you need to converse with users from external organisations where you will have been a 'Guest' in one of their Teams. Those of you that do a lot of collaboration with other organisations in Teams will know exactly the frustration involved here!
It's also important to note that in a similar way to a Private channel a shared channel will get it's own set of permissions and therefore its own SharePoint site, the below diagram explains how this looks.

So explanation out of the way, how do we get it setup?
Shared Channels require two organisations to configure a relationship using B2B Direct Connect and in doing so those organisations can then interact with one another and collaborate using Shared Channels. It's important to note that when setting up Shared Channels there will always be a primary tenant and a secondary tenant - The primary tenant is the tenant where the channel is created and all of the information within the channel will be subject to their security and data governance controls, keep that in mind if setting this up for clients as it should be well understood who's governance controls take precedence! The secondary tenant is the tenant being invited to the Shared Channel for collaboration.
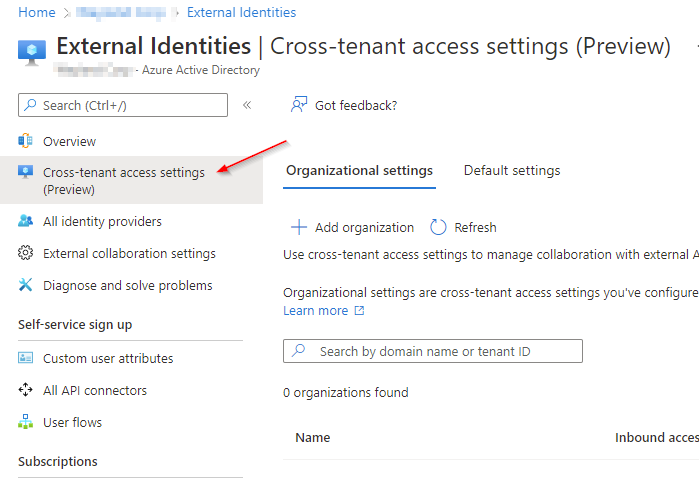
The B2B Direct Connect relationship is configured within Azure Active Directory-->External Identities-->Cross Tenant Access Settings.
In addition to this, because the feature is currently in preview, you may need to update your Teams update settings to allow preview features, to do this you need to change the setting to Enabled.
So lets walkthrough the setup between my two tenants - Keep in mind if doing this for production tenants you will need to speak to the administrator of the tenant you intend to setup the trust for. Let's jump in!
Starting with the primary tenant jump into the Teams admin centre and make sure to enable the preview features.


Next, we need to allow users to create Shared Channels, which we do using the Teams policy settings.


In our tenant we want to allow all users to be able to create shared channels and invite users as well join external shared channels so we will leave these all on for the Global policy.
Next we need to jump into Azure Active Directory to configure the cross tenant access settings.

Go ahead and 'Add Organisation'

Search for the organisation you intend to collaborate with using their domain name or tenant ID, make sure to confirm you are connecting to the correct tenant and confirm this with the partner admin.


You will notice that the new tenant will now be added along with both Inbound and Outbound access settings - Inbound settings with an org are required for initiating or hosting Shared Channels and collaboration with other tenants - Outbound settings with an org are required to accept Shared Channel requests from other tenants. There are default B2B Direct Connect settings that can be configured globally, by default each organisation you add will inherit these settings, for security reasons I recommend you leave the global settings in their default state and update the per org settings instead.
For our primary tenant we will be configuring it using the Inbound settings as this tenant will be hosting the Shared Channel, go ahead and select Inherited from default underneath Inbound access.

Configure the settings as they are below


When selecting to Add Microsoft applications, choose Office 365

Then go ahead and save the settings and head to Trust settings.
Your mileage will vary greatly here as it depends on A) your risk appetite and B) the Conditional Access policies you have configured within your tenant and if you don't have one configured that falls in line with the options provided you'd have to go and create them. Trust settings allow you to accept claims from other Azure AD tenants when external users access your resources, however in order for your tenant to accept those claims you must have a policy configured for said requirement and be targeting guest users for the cloud apps in question.
For example, if I were to tick the box for Trust multi-factor authentication from Azure AD tenants I would have to have a Conditional Access policy in place that targets guest users, Office 365 and requires MFA however by enabling the tick box if the external user has already satisfied the MFA requirement in their home tenant, they will not be prompted for MFA again in ours, a handy setting to rid of any prompt fatigue and ensure the authentication process is smooth. We will go ahead and enable this for now.

Something I did pickup on here although needs more testing to confirm - I had an issue with MFA token issuance if the secondary tenant (the one invited to the Shared Channel) is using third party MFA solutions such as Duo - Because Azure AD shows third party MFA claims as single factor, the trust settings did not work as expected and I could see my sign in attempts failing, I did not have this issue if both tenants were using Azure MFA.

Shared Channels will likely be a two way street between partner organisations and as such you may also need to enable the Outbound access settings so users can accept joining Shared Channels from the partner tenant but keep in mind you do not have to do this if you only plan hosting Shared Channels, it may be worth discussing this with the compliance/governance team as there may be implications to not having control over the information within a Shared Channel hosted by a partner organisation.
Once you've saved those settings that's all there is to configuring the primary tenant for Shared Channel use, now the secondary or partner tenant needs to be configured.
In order to configure the secondary tenant enable the same settings within the Teams admin centre and add the partner organisation within the cross tenant access settings only this time only the Outbound access settings need to be configured.


Remember to add Office 365 as your selected Microsoft applications

Accept the popup prompt advising you about setting up outbound access.

Once the Outbound access has been configured the final step in setting up a Shared Channel is to create one!
You will remember that in our configuration above we have configured our primary tenant to be able to create the Shared Channel and invite users from the secondary tenant, so let's head back to our primary tenant to create the channel.
Before you can create a Shared Channel, you must first enable the public preview within the Teams application, you can do so by following the below.


Once you've enabled the Public Preview, you can now create the Shared channel and invite your external users.

By default the Share this channel with everyone on the team is enabled

You'll notice that when inviting users it says their name and then (External) - If using B2B collaboration and inviting external users it would say (Guest) and would add them as a guest user in the tenant.

How the channel looks in the primary tenant Teams app.

How the channel looks in the secondary tenant app.

Once the channel has been shared, the recipient must accept the permissions popup prompt, this enables access to the underlying SharePoint site so that files can be shared. In my testing I found that this was a little buggy, for example the first shared channel I setup, my recipient never received the popup until I navigated to the 'Open in SharePoint' option and even then, the files tab never seemed to catch up in Teams web or local.

Expected permissions popup in Teams although in my testing I did not receive this until I 'Opened in SharePoint' and accessed via a browser.

Here I could then upload files successfully.

The Teams client however never seemed to catch out despite multiple sign outs and disabling/enabling the public preview settings.

I have raised a case with Microsoft to report this as a bug.
If all went well however you should now be able to share conversations and files!


And that's all there is to it! I am sure the minor bugs will be worked out before it goes into GA but until then I hope this guide has been useful for anyone wanting to test it out!


Comments